Part 1. Common Questions Related with PhotoShop Watermark:
Part 2. PS Watermark Tutorial - How to Add Watermark with PhotoShop
Part 3. Batch Watermark with PhotoShop?
“I want to add logo to existing pictures. Can anyone just tell me know how to watermark images with PhotoShop?”
“How do I add my Avatar to my facebook images as a watermark with PS? Some people use my pictures in their social media, which I don’t like to see it happen.”
“As a photographer, I always take a lot of photos and I usually share them on Flickr to get potential buyers, of course, I don’t want my images be abused by others. As a new PS user, I need a suggestion about how to fast watermark images with PhotoShop.”
We are living in the world interweaves with network, adding watermark to photos is more and more common. You may have this or that reason to need your photos to be watermarked. We know PS so long for its power on dealing with picture issues. Hence, there is no doubt that PhotoShop, the king of photo editor, becomes your very first choice when dealing with watermark issues. But you never know that things can be quite complicated sometimes, maybe not for others but for newbies. Saying here, I mean using PhotoShop watermark is not as easy as pie for PS beginners, as its operating interface is a bit complex and it’s hard to find your watermark button among numerous menu selections. So now, we just want to provide some tips on how to fast add watermark with PhotoShop for beginners.
Before start applying PhotoShop watermark, you may need to learn a conception about PS layer system. All the pictures or images you added to PS are loaded as separate picture layers. A GIF file will be loaded as a group of layers. PS only makes changes on layers.
First Step Is About Loading Your Image to PS.
Install and launch PhotoShop CS5(or others) on your computer. Choose [File], [Open] and click image directory where the image needs to be watermarked. Let’s assume the image name is image1. If you think the present image size is not original, you can hit Ctrl + 0 to adjust image1 to 100% full size.

Second Step Is to Add Watermark with PhotoShop.
The operations is as the same as First step, but you need to choose the image which you want to use as a logo, we assume its name is image2. Drag image2 window to a smaller window. Select Drag Tool “Cursor Icon” or use its shortcut key by clicking “V” on your keyboard, then select image2 and drag it into image1. After done, you can find your logo – image2 on image1: image2 will be showed as default “layer1” layer and image1 will be demonstrated as “background layer” layer.
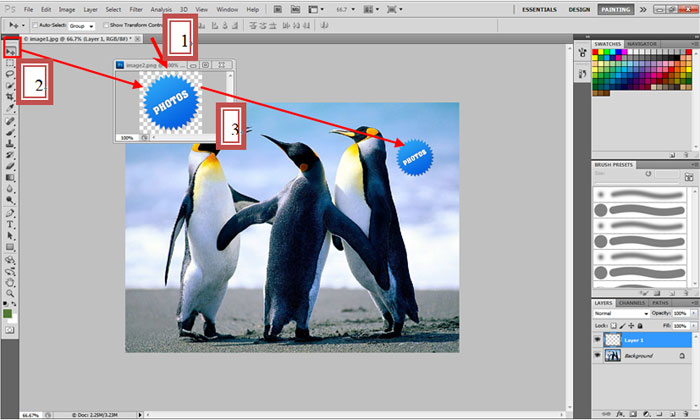
Third Step of PhotoShop Watermark Is Modifying The Watermark Logo.
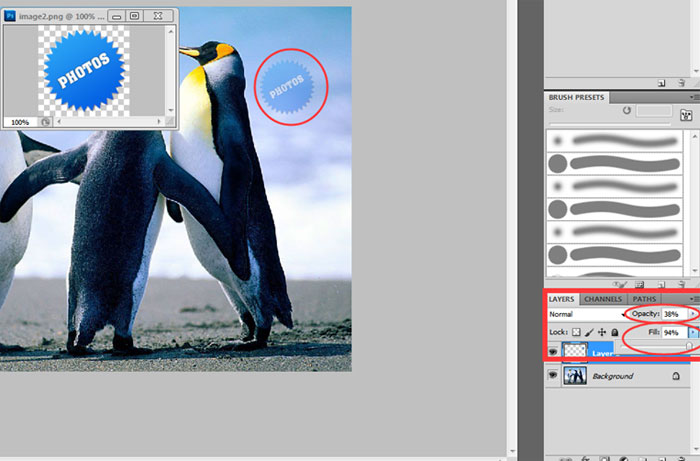
Select layer1, double click image2, adjust the Opacity and Fill to the extent you like best, this can help you make the logo light-colored.
Also you can rotate the watermark to an arbitrary angle, by selecting image2, hitting [Image], [Image Rotation], [Arbitrary] and inputting the angle into the input box.
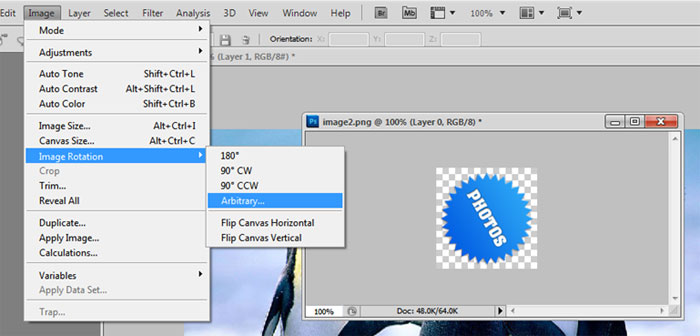
Or you can rotate the whole canvas if you like. The operations are the same as the ones above, but you need to choose the background layer. The final picture we got is below.
But what if you have a bunch of photos needed to be watermarked, how to make it for once and for all? Keep reading, we’ve prepared the key to the question for you.

If you want to batch watermark images, it can be too complicated to watermark images with PhotoShop in bulk, which you may have heard of before. PS is not designed for watermark specially. For beginner, we don’t suggest you batch watermark with PhotoShop. Instead, we recommend you a lightweight watermark tool which can easily get the task done. Its name is Watermark Software. With only three steps and a few minutes, it will automatically output the watermarked photos for you. It’s simple and user-friendly, we think you may want to have some knowledge of it.
The page to land this software: https://www.watermark-software.com/
Or you can simply download it by clicking button below:
1.Load images through [Add Folder] or [Add Files]. Then click [Next Step].
2.Add Text watermark or Image watermark in the next phrase. Do remember to [Save & Create a New Layer]. Then click [Next Step].
3.Choose [RUN], done!
Below, we’ve attached the screenshots of steps for your reference.
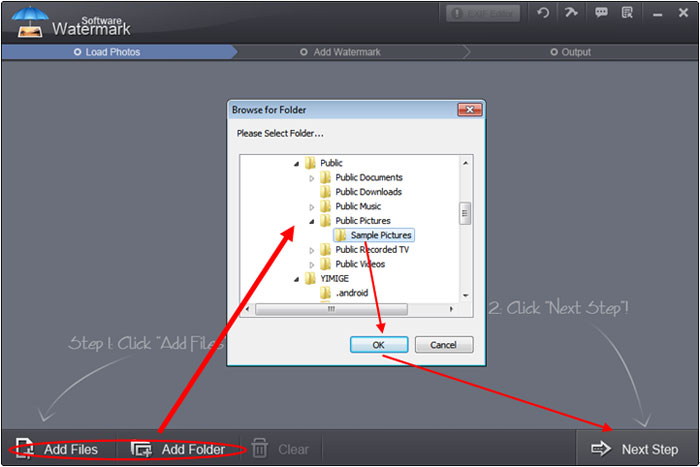
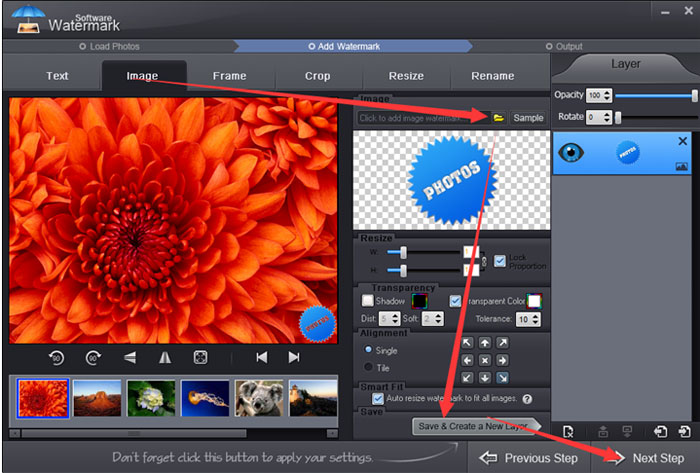
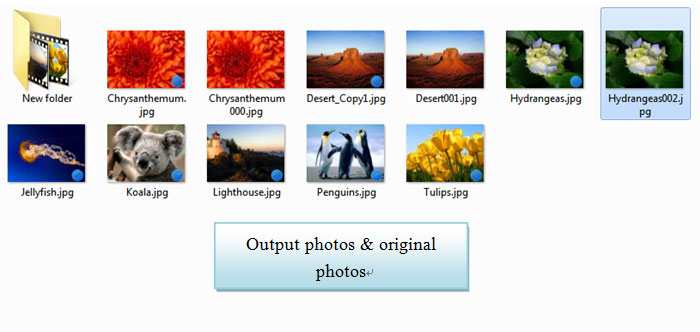
After reading or using it yourself, you may find it quite easy to operate. If you think this lightweight watermark software efficient, why not share it with your friends?
At last, thanks for your time and reading of PS watermark tutorial! See you next time.
Watermark Software (photo edition) : This watermark tool provides professional image protecting solution for your online photos. The exclusive image processing technology lets you able to watermarking 500 photos within 1 minute.
Add image watermark to your photos within 3 step
Batch watermark photos to save your time
Picture Watermark Software - protect picture copyright quickly
How to Convert YouTube to Picture - it will be extremely easy with Video to Picture Converter, which enables you to convert all key video formats to seriate pictures or animated GIF.
Add Text to Picture - show your infotmaion on your shared pictures.
Put Logo on Pictures at Once - Put logo on pictures at once to protect your copyright.
How to Copyright Pictures - The copyright picture is protected object what holder does not would like anybody use it without his permission.