Part 1. Watermark image to Your Photo for Copyright Protection
Part 2. How to Use Watermark Software to Make Image Watermark for Your Photo
Part 4. Step 2, Create and Edit Image Watermark
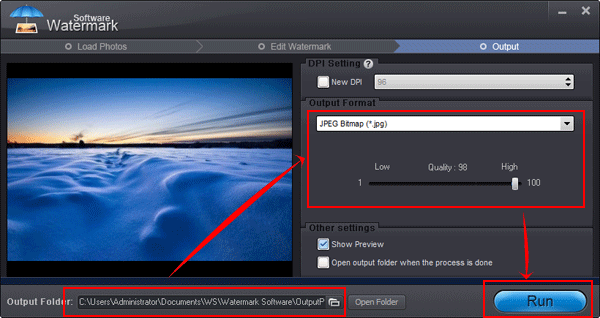
Part 5. Step 3, Output Settings
If you always share photos, especially post them online or email them, you must know that others could have a chance to copy these photos for their own use without your permission. You might never know what will happen to them. If you do care your precious photographs, I think it’s time to take an action to protect them from unauthorized copying and using. While there are lots of ways to copyright your photos, watermarking image is probably the most effective one.
To put something, like copyright info, logo or signature to your photos will directly tell every viewer that this photo only belongs to you. They need to get your permission before they want to use your work commercially. So watermarking image is fairly effective. But to complete this task, a proper image watermarking program is needed. You can Google “watermark software” to find a right one you like. Here I will use Watermark Software developed by watermark-software.com to quickly guide you how to add text/image watermark to photos.
Like most image watermarking programs, Watermark Software helps you add image, text, logo to photos with clicks. But what make it stand out from so many programs are its well-designed interface, ultrafast processing speed and rich editing options (resizing, cropping, renaming, etc.), Watermark Software is a multi-function watermarking solution for your photos, which lets you create various styles of watermarks and customize them as your will. The following part is a quick tutorial of watermarking photos with Watermark Software in three simple steps.
The Watermark Software is professional photo watermarking tool. It has powerful function and simple user interface, with this program you can add watermark to your images few steps.
Step 1, Load Images
Click to download Watermark Software and install it. Open Watermark Software, load the source images by clicking “Add Files”/”Add Folder” on the main interface. And then click "Next Step" to its editing panel.

Step 2, Create and Edit Image Watermark
Click “Image” tab, we will come to image watermark editing panel. Here you need to select an existing watermark by hitting “Sample” button or you can directly import new one from your hard disk by clicking "Browse".
After image watermark has been loaded, you can edit more to make it unique for your photos.
Here you can change its size, adjust its transparency, position and more.
Note: “Tile” is to repeat watermarks on photos; it is a strong copyright protection mode. “Single” is to put only one watermark on photos.

Step 3, Output Settings
After your editing has been finished, click “Next Step” to customize output settings: specify output image format or keep original; specify output folder.
At last, click "Run" to start processing. The whole process will be OK in minutes.

Watermarking images is so easy and fun; why not copyright your images with this Watermark Software right now? Click to have a free trial!
Still have trouble on watermark image? Please Contact Us >>
Watermark Software (photo edition) : This watermark tool provides professional image protecting solution for your online photos. The exclusive image processing technology lets you able to watermarking 500 photos within 1 minute.
Protect image copyright - when you upload your photo on internet
How to copyright an image - step to step guide
How to watermark and batch convert images
Image protection - how to protect image from web stolen
How to add image to video with video watermark pro
Watermark app on cell phone